TRANSLATION

Showing posts with label Blog. Show all posts

Wednesday, 10 March 2010

Tạo phân trang cho Blogspot

Blogspot theo mặc định sẽ chỉ hiển thị phần "Bài đăng cũ hơn" ở dưới bài viết. Nhưng ta có thể hack một chút để biến nó thành các phân trang 1/2/3/4/.... như hình

page_navigation

Đầu tiên, ta chèn đoạn code CSS sau vào ngay trên dòng ]]> trong phần chỉnh sửa HTML của Blog :
.showpageArea {padding: 0; margin:0;
}

.showpageArea a {border: 1px solid #000;
color: #fff;font-weight:normal;
padding: 3px 6px ;
margin:0px 4px;
text-decoration: none;
background-color: #6f6f6f;
}

.showpageArea a:hover {
font-size:11px;
border: 1px solid #00558f;
color: #575757;
background-color: #3D3D3D;
}

.showpageNum a {border: 1px solid #000;
color: #fff;font-weight:normal;
padding: 3px 6px ;
margin:0px 4px;
text-decoration: none;
}

.showpageNum a:hover {
font-size:11px;
border: 1px solid #00558f;
color: #575757;
background-color: #5D5D5D;
}

.showpagePoint {font-size:11px;
padding: 2px 4px 2px 4px;
margin: 2px;
font-weight: bold;
border: 1px solid #00558f;
color: #fff;
background-color: #1589a2;
}

.showpage a:hover {font-size:11px;
border: 1px solid #00558f;
color: #fff;
background-color: #1589a2;
}

.showpageNum a:link,.showpage a:link {
font-size:11px;
padding: 2px 4px 2px 4px;
margin: 2px;
text-decoration: none;
border: 1px solid #000;
color: #fff;
background-color: #6f6f6f;}
.showpageNum a:hover {font-size:11px;
border: 1px solid #00558f;
color: #fff;
background-color: #1589a2;
}


Tiếp theo, tạo một tiện ích HTML/javascript rồi dán đoạn code sau vào:
Rồi kéo và thả nó vào dưới phần bài đăng trên blog như thế này :


Ở đây "var pageCount=5;" là số bài viết sẽ hiển thị ở mỗi phân trang, còn var "displayPageNum=9;" là số phân trang. Lưu ý là thủ thuật này chỉ hoạt động khi số bài đăng trên blog bạn đủ nhiều, trong ví dụ này thì số bài viết mà blog của tôi cần phải nhiều hơn 5x9 = 45 bài thì tiện ích phân trang mới hoạt động. Bạn có thể điều chỉnh lại cho phù hợp. Save lại và kiểm tra kết quả. Chúc thành công.
Theo myhobby

Chèn nút nhúng Linkhay và Tagvn vào Blogger

Một trong những cách để bài viết của bạn được nhiều người biết đến chính là việc sử dụng các dịch vụ bookmark và chia sẻ nội dung. Ở Việt Nam, LinkHayTagVN có lẽ là hai địa chỉ được nhiều người dùng nhất.

Bạn có thể tự chia sẻ bài viết của mình lên các dịch vụ này để tìm kiếm đọc giả.
Đây là code sử dụng cho Blogger. Hãy chọn một trong hai file này để tải về:


Cách chèn vào blog:

Đăng nhập Blogger, vào thẻ Bố cục (Layout) -> Chỉnh sửa HTML (Edit HTML), đánh dấu chọn Mở rộng tiện ích mẫu (Expand widget templates), tìm:
<div class='post-footer'>
<!-- Dán code ở đây -->
<div class='post-footer-line post-footer-line-1'>
<span class='post-author vcard'>
<b:if cond='data:top.showAuthor'>
<data:top.authorLabel/>
<span class='fn'><data:post.author/></span>
</b:if>
</span>

Thay <!-- Dán code ở đây -->
bằng nội dung của 1 trong 2 tệp tin .txt đã tải về bên trên.

Hình dưới là hiển thị File 2 trên blog:

Mạng xã hội

* AddThis là nút nhúng số 1 trên internet giúp người đọc đánh dấu và chia sẻ nội dung đến tất cả các mạng xã hội thông dụng. Chỉ cần sử dụng 1 nút nhúng này thay vì dùng nút nhúng của từng dịch vụ riêng lẻ.

(Nguồn: thuthuatblog.com)

Sunday, 10 January 2010

Để Google đánh chỉ mục cho blog của bạn

Trong những năm gần đây, một dạng trao đổi thông tin mới ra đời và phát triển với tốc độ rất nhanh, đó là blog (hay weblog). Blog thoạt đầu được phát triển như một dạng nhật ký trực tuyến với những suy nghĩ cá nhân được đưa lên web. Hiện nay, ứng dụng blog trở nên phong phú hơn và dễ thấy nhất là việc dùng blog làm một kênh thông tin nội bộ cũng như bên ngoài công ty.

Một trong các dịch vụ blog miễn phí khá nổi tiếng là dịch vụ Blogger của Google (www.blogger.com), nó cho phép bạn tạo và duy trì các blog trên máy chủ Blogger. Bài viết này không trình bày cách tạo một blog trên Blogger (việc này khá đơn giản và đã có khá nhiều bài viết hướng dẫn), mà chỉ hướng dẫn bạn cách đưa blog vào Google Sitemaps, để Google đánh chỉ mục cho blog của bạn nhằm tăng cơ hội xuất hiện trong kết quả tìm kiếm của Google.

Trước hết chúng ta hãy tìm hiểu qua về Google Sitemaps. Google Sitemaps hiện đang ở bản beta, được Google phát triển với mục đích cung cấp một cách thức đơn giản cho người dùng mô tả website của họ. Thông qua việc cung cấp cho Google Sitemaps thông tin của site (cấu trúc, các trang web quan trọng cũng như mức độ thay đổi của chúng...), bạn đã hướng dẫn cho công cụ dò tìm ("spider") của Google cách đọc thông tin và đánh chỉ mục cho website của bạn.

Dưới đây là hướng dẫn chi tiết cách đưa blog vào Google Sitemaps:

Bước 1: Đăng nhập vào Google Sitemaps thông qua tài khoản Google của bạn. Ngay ở đầu trang bạn sẽ thấy ô nhập liệu để nhập site cần đánh chỉ mục. Hãy nhập vào đó địa chỉ (URL) blog của bạn (ví dụ: http://khanhle.blogspot.com/)

Sau đó nhấn nút OK. Blog của bạn sẽ được thêm vào tài khoản như hình dưới:

Bước 2: Xác thực quyền của bạn trên blog vừa nhập

Nhấn vào liên kết Verify, bạn sẽ được chuyển đến trang có hình như sau:

Google cung cấp hai phương pháp xác thực. Tuy nhiên ta chỉ chọn phương pháp thứ hai: Add META tag, vì đây là phương pháp duy nhất mà Google Blogger hỗ trợ.

Sau khi chọn, trang web sẽ sinh ra mã thẻ META, ta sẽ chép đoạn mã này vào phần template của blog.

Bước 3: Dán thẻ META vào template của blog

Đăng nhập vào www.blogger.com. Vào blog của bạn, di chuyển đến tab Template.

Chèn đoạn mã thẻ META vào như ví dụ sau:

Lưu lại thay đổi bằng cách nhấn nút Save Template.

Nhấn vào nút Republish Index only. Sau đó đợi vài giây cho đến khi blog của bạn được xuất bản trên web (publish) hoàn toàn.

Bước 4: Trở về lại Google Sitemaps để kết thúc quá trình xác thực.

Trở về lại Google Sitemaps, ta có thông báo: "Ive added the META tag in the home page of http://khanhle.blogspot.com/".

Nhấn vào nút Verify để kết thúc quá trình xác thực.

Bước 5: Đến bước này blog của bạn đã được đưa vào Google Sitemaps. Tuy nhiên, bạn cần phải cung cấp cho Google địa chỉ chứa sitemap của blog của bạn. Ta sẽ dùng site feed (ATOM/XML) của blog làm sitemap.

Trở về hình ở bước một và nhấn vào liên kết "Add a Sitemap", bạn có được:

Chọn Add General Web sitemap

Cung cấp địa chỉ URL blog của bạn, đó là địa chỉ của file atom.xml. Ví dụ http://khanhle.blogspot.com/atom.xml (*):

Nhấn vào nút Add Web Sitemap.

Đến đây với 1 số blog thì coi như đã hoàn thành, tuy nhiên có một số blog thì sẽ báo lỗi. Nguyên nhân là do đâu? Đó chính là do tính năng Feed Redirection (với những blog dùng dịch vụ Feedburner) gây ra.

Để khắc phục bạn sử dụng địa chỉ như sau:
http://yourblogurl.blogspot.com/atom.xml?redirect=false&start-index=1&max-results=100
tức là bạn chỉ cần điền atom.xml?redirect=false&start-index=1&max-results=100 vào khung My Sitemap URL is.

Cuối cùng bấm nút Add General Web Sitemap để hoàn tất.

Bạn sẽ nhận được thông điệp xác nhận của Google:

"You have added a Sitemap to http://khanhle.blogspot.com/. Reports may take several hours to update. Thank you for your patience!"

Chúc mừng! Bạn đã kết thúc quá trình đưa blog vào Google Sitemap. Bây giờ thì bạn chỉ còn phải đợi Google đánh chỉ mục cho blog của bạn.

(*) Chú ý: Bạn phải kích hoạt chức năng Site Feed cho blog của mình trước khi thực hiện bước này. Dưới đây là hướng dẫn.

Đăng nhập vào www.blogger.com . Vào blog của bạn, di chuyển đến tab Setting > Site Feed. Và thực hiện như hình sau:

Lưu lại cấu hình và "publish" lại blog của bạn.

Bước 6: Kiểm tra kết quả đánh chỉ mục của Google

Sau khoảng vài giờ hoặc một ngày, bạn hãy kiểm tra tài khoản trên Google Sitemaps xem blog của mình đã được Google đánh chỉ mục chưa. Nếu Google đã kiểm tra blog, bạn sẽ có kết quả tương tự hình dưới:

Tùy vào lượng tin, nội dung cũng như số lượng người truy cập mà trang blog của bạn có cơ hội xuất hiện trong kết quả tìm kiếm của Google hay không. Tuy nhiên, nếu từ khóa là tên của bạn hoặc các từ riêng biệt chỉ xuất hiện trên blog của bạn thì khả năng blog của bạn nằm trong Top 10 kết quả của Google là gần như chắc chắn.

Ví dụ sau đây kết quả của sử dụng tìm kiếm thông qua Google với từ khóa "le canh khanh":

Nếu blog của bạn khá nổi tiếng, nhiều người xem và bình luận thì cơ hội cho nó xuất hiện dưới nhiều từ khóa khác nhau là hoàn toàn có thể, còn không thì thông qua tên, bạn bè cũng dễ dàng tìm ra blog của bạn.

Nguồn: Blog4vn.blogspot.com

Thursday, 12 November 2009

5 Ways To Keep Your Blog Readers Coming Back Again & Again


Are you struggling to make your blog readers return to your blog? Don’t worry, you’re not the only one. Twitter only had a retention rate of 40% when they experienced massive growth, compared to FaceBook and MySpace who accomplished 70%, according to nielsen blog post. It’s safe to say that even most popular websites like Twitter in this case, experience difficulty in getting repeated traffic.

With all the efforts it takes to attract fresh readers, once you get them to your blog, you need to keep them interested in your blog. Here are some helpful tips for encouraging your visitors to stick around and come back to see what your have to tell:


1. Attract the Right Audience

In order to get people returning, you need to attract the right people in the first place. If you’re using ad-networks to advertise your blog, you should combine this effort with direct advertising on specific niche websites. Ad networks gets you wide reach while niche content sites get you more targeted traffic.

You should look for content sites or blogs that would appeal to your target blog. If you’re stuck on where to advertise, you can buy Ad Space at a Banner Auction website. Unlike automated systems, Banner Auctions enable you to selectively handpick your ad placements and deal directly with site owners.

2. Contests

Everyone loves to win prizes, especially when the entry is free and without any conditions attached to it. Contests are a great way of promoting brand awareness and discovering more about your target market.

When running a Contest, make sure to provide something appropriate and relevant to your blog if you wish to attract the right readers. A free iPod for example for a fat loss blog would be quite unproductive and most probably a waste of your resources and efforts.If you just wish toattract as many people as possible, regardless of targeting potential people, then offer something general like cash prizes or any cool gadget.

Making your Contests regular is also a good idea to get repeated traffic. This keeps users interested and coming back to enter.

Here are some more tips for contests:

  • Announce the winner on your blog and send an email to all entrants advising them of a new challenge;
  • Become included on contest sites to get more contestants;
  • Provide users the opportunity to send contests to a friend or to promote it any way they can;
  • Give an extra entry if they perform any bonus steps;
  • Limiting the number of entries is strictly not advised;
  • Give a time limit for accepting entries.

3. Discounts and Freebies

Everybody loves a great bargain. Many people are searching for good discounts & freebies. You can blog upon latest discounts on various domain registrars or web hosting, if you are running a webmaster related blog.

The Key to success of this method is that you have to do it as many times as possible so that people will keep looking around your blog for latest discounts coupons and freebies.

4. Hints, Trivia, Tips, & Advice Columns

Providing regular tips on your target audience’s areas of interest is a great way of generating repeated traffic.

For example, if you are running a blog related to herbal medicine, offer regular natural healing remedy. You can also provide “thought for the day”. This will keep your viewers returning to find out more remedies or trivia every day.

Providing advice columns establishes your blog as an expert in the field. Remember, people are interested in reading questions submitted by ordinary people and seeing the guidance that has been given to him by you.

5. Start a Discussion Forum

Connecting your blog to a Discussion Forum allows users to discuss their idea and their experiences will make them appreciate your blog and feel like part of a community. Starting an Discussion Forum is very easy but it’s difficult to handle it. Make sure you take full care of both i.e your blog and it’s discussion forum otherwise it will results in bad effect on your blog.

Keep That Traffic Flowing

Implementing interactive and informative aspects to your blog will not only add fresh content, but will also attract return visits.

Sustaining repeat visitors has many benefits to your blog such as it helps to build trust, make more money blogging, build a stronger community, helps to establish yourself as an authority blogger for more success.

Now, let me know your Favourite ways of getting repeated traffic. Are there any more ways which you would like to share on this blog? Let me know all that by Commenting below.

Wednesday, 7 October 2009

How to Promote a Blog with Social Media


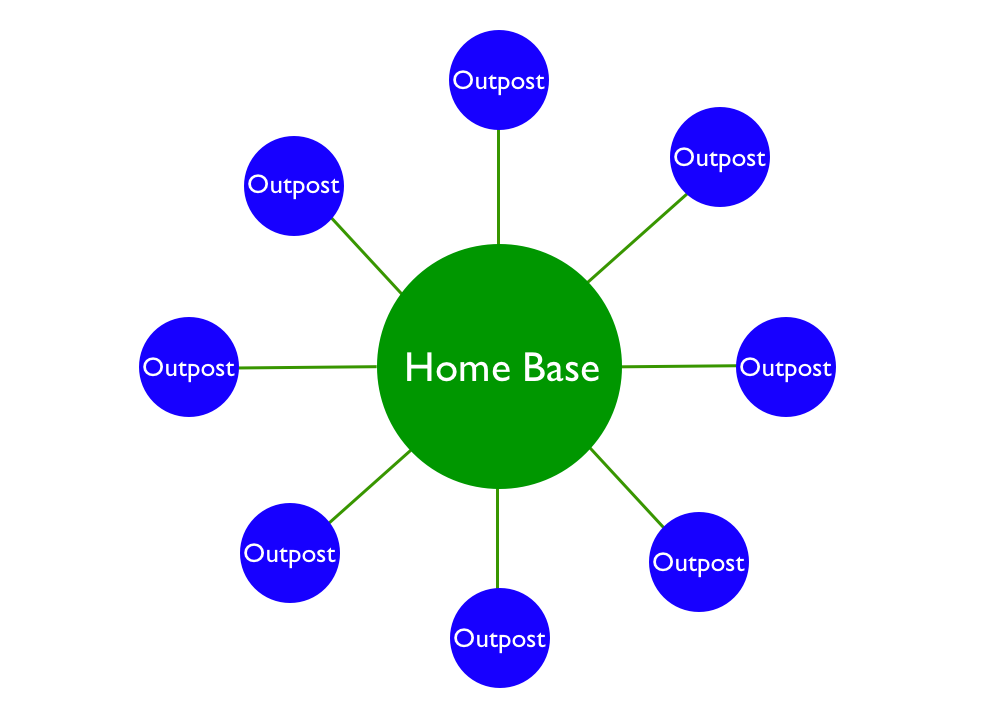
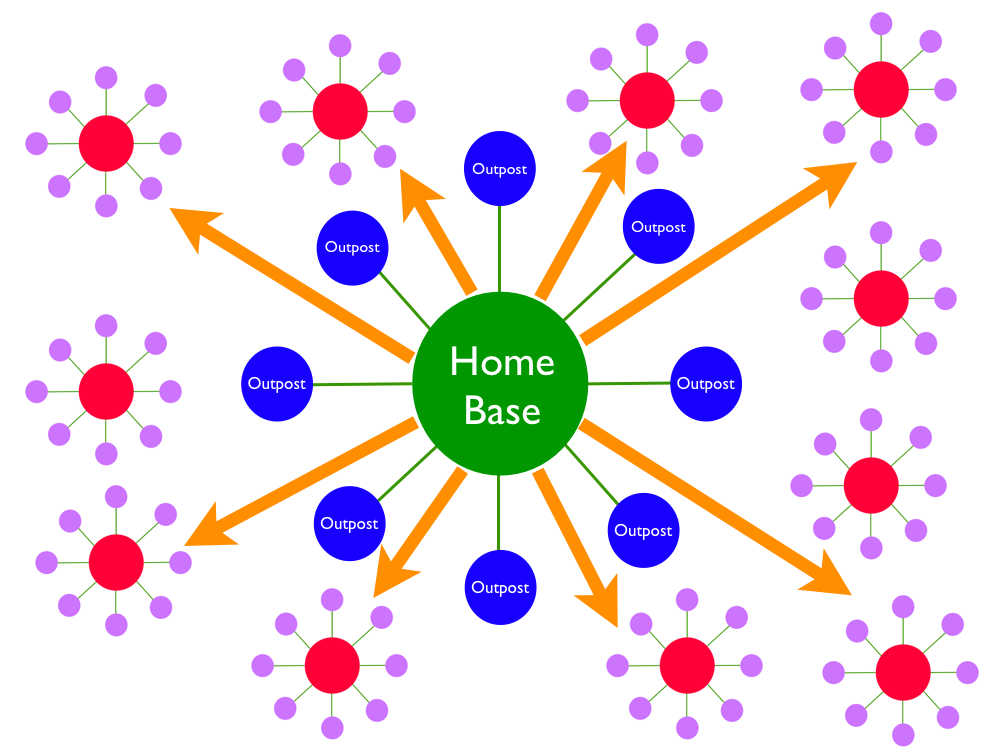
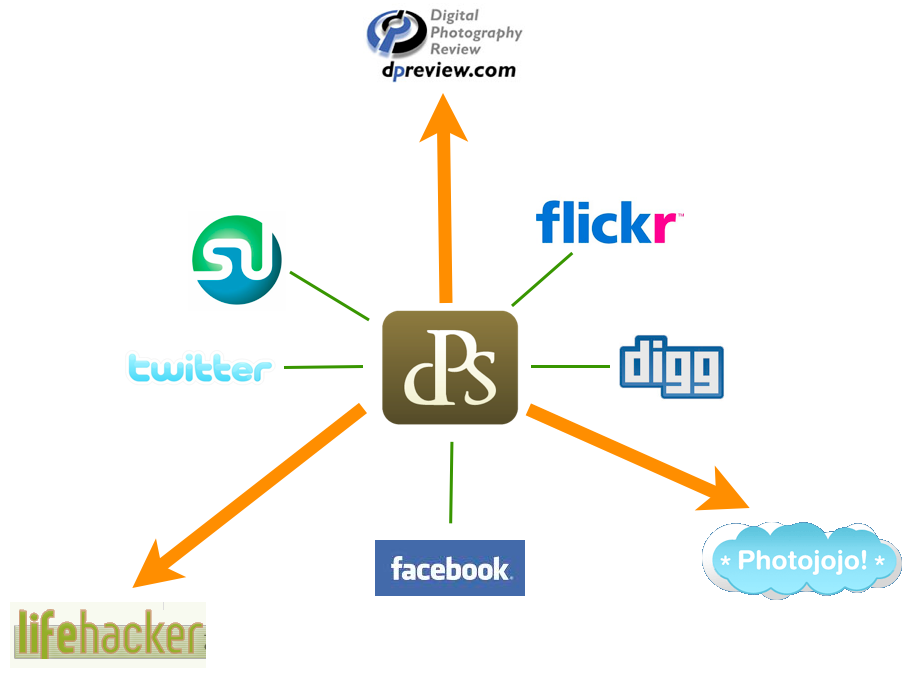
Last year I wrote a post exploring how I use Social Media to promote my blogs - the post looked at the idea of creating Home bases and Outposts (a metaphor that I picked up from Chris Brogan).

In this video I extend the idea a little and talk about the importance of not only develping a presence on social media sites but also making connections with and developing a presence on other people’s home bases. You can see the full sized version of this video at How I Use Social Media to Promote My Blogs.

Here are the screen grabs from slides I’m sharing on this today at the MarketingNow conference in Melbourne.

promote blog

promote blog 2

promote blog 3

A Simple Way To Funnel New Traffic & Sales From Buried Blog Archives

LynnterryprobloggerIn this guest post internet marketer and full time blogger Lynn Terry of ClickNewz shares one of her newest tested blog marketing strategies.

On the current theme of Content Marketing, I have a super simple strategy I have been testing to increase exposure and profit that you’ll really enjoy. It’s simple, it’s free… and it works.

Darren gave us 9 ways to seed content to consistently grow our blog readership with each new blog post. This 10th method will bring you a lot of readers as well, without even writing a new blog post…

Putting Your Best Content To Work For You

If you’ve been blogging for any amount of time at all, you probably have some incredible posts buried in your archives. Even blog posts written only a month or two ago rarely get a new comment. Properly optimized posts might continue to receive new visitors through the search engines, but most of your content is buried - both in your archives, and in the search results.

I make a regular practice of browsing through my archives for pillar posts. I often repurpose these posts into articles for Article Marketing, meaning I make a few small tweaks and submit them to EzineArticles.com.

There are 3 good reasons to submit your better archives to EzineArticles:

1. A keyword-rich title on EzineArticles can easily get your article ranked very well in Google search results, as EzineArticles is a content authority site. If the article is not ranking well on your domain, or if you have a relatively new domain, this is a great way to get “indirect” top rankings very easily.

2. Each article you submit may include an author bio, or resource box, which will have a live link back to your blog. Readers and search engines alike follow these links, and inbound links will help your blog get indexed or better ranked.

3. Publishers search EzineArticles.com for great content to use on their websites, at their blogs, and in their email newsletters. In addition to getting more inbound links, you may also find your content in front of a very targeted audience.

Duplicate Content?

There are many theories about duplicate content, and possible penalties for using the same content in more than one place on the web. Most of these theories are completely unfounded. Read this if you’re concerned about duplicate content.

Basically, Google wants to offer a wide variety of results for any given search. If your blog post is not already ranking in the top 10 results for a specific keyword phrase, you can easily achieve an “indirect” top ranking by submitting the post to EzineArticles.com as an article with a keyword rich article title.

Taking it one step further…

This method has been working very well for me, so I decided to take it one step further. Instead of repurposing a great blog post into an article, I turned a couple of my posts into short reports.

It’s the exact same content, just a new format: PDF.

PDF files are very easy to create. You can use any number of free PDF converters. Or you can download OpenOffice.org for free, which will allow you to turn any document into a PDF file with one click.

Don’t be overly concerned with the length of the report. Even 3-5 pages of great content will make a very nice short report that you can give away.

You can also add a cover page, a copyright/disclaimer, and an about page to round it out if you like. If you want your report to go viral, be sure to include a paragraph that clearly spells out the giveaway rights to your reader.

The Results

I decided to try this with a great how-to post I had written for my blog. This particular post ended with a recommendation for Darren’s workbook titled 31 Days To Build A Better Blog. I didn’t do any fancy formatting, I simply copied the blog post and pasted it into a document - and then converted it to a PDF file.

The result? The PDF file converted readers into buyers almost 4x more than the blog post!

Thanks to that short report, I am nearing the $1,000 sales mark for a product that sells for less than 20 bucks - which makes for a nice little commission check… on just one post!

The obvious conclusion here is that a report, or a PDF file, has a higher perceived value. The exact same content, with the exact same call-to-action, has proven to achieve a much higher conversion rate in PDF format.

Using Reports For Links, Traffic & Sales…

You should use one of your new short reports as an incentive for your readers to subscribe to your newsletter or blog updates. This is a great way to increase your subscriptions, and therefore your readership.

You can use your other new reports much the same as you use articles, as well. Submit your reports to free ebook directories, the same way you submit articles to article directories.

Google will index PDF files, so the links within your report will count as inbound links to your blog. Your report may also rank well in Google, which is another great way to funnel new readers into your blog.

Tip: Don’t submit the report you use as your opt-in incentive in other places around the web. Your new visitors will be disappointed to arrive on your blog, subscribe, and receive the same report that brought them there in the first place. Mix it up!

Make sure you include a strong call-to-action in the PDF version of your content. If your content is not directly recommending a product, you can invite the readers to related articles on your blog - or to subscribe at your blog for more great free reports on the topic.

Browse through your blog archives today, and locate some of your best (buried) posts. Repurpose those posts into short reports, and put that great content back into circulation to bring in more readers - and make more sales!

Best,
Lynn Terry
ClickNewz

p.s. I found this method to be working so well for me, that I contracted someone to convert and format my posts into attractive PDF files. You can easily outsource this task by posting a request on freelance sites, or on Job Boards at various forums.

If you would like to see an example of one of my repurposed blog posts, feel free to download How to Write a Product Review.

How Passion Can Transform Your Blog

By Leo Babauta from Zen Habits.

Many of the problems that many bloggers face — not drawing enough readers, not knowing what to write about, not writing well enough, not finding the time to blog — can all be solved with one solution.

And that solution’s name is Passion.

All of the problems mentioned above, and more, arise from forcing things. When you write about something you don’t care much about, you’re forcing it. When you sit down to write but have nothing to say, you’re forcing it. The blogger who has no time to blog, to make his blog better and really produce the great content needed to attract a larger readership, is forcing it as well.

Forcing things makes them worse. It’ll show up in your writing. Readers aren’t interested in reading something you’ve forced, and they’ll go elsewhere.

Passion is the exact opposite: it will infuse your writing with excitement, make it more interesting, compel people to read. They’ll share your posts and the passionate content will draw others.

It’s not the answer to all problems — you still need to be a decent writer, and share really useful information, and help people solve problems, and write great headlines. But focusing on passion can really transform everything about your blog and you as a blogger.

Here are a few ways:

1. Write what you’re passionate about

What do you really care about right now? What have you been reading online, passionately, and what changes have you been making recently in your life? These are good indicators of what you’re most exited about at the moment. And if you write about these things, you’ll write well, and won’t need motivation to write.

2. Find something to be passionate about

If you don’t already have this passion, you’ll need to find it. Don’t live a passion-less life — not only is it boring, but bloggers who don’t lead interesting lives (in one way or another) are boring. To have something to say worth listening to, you need to care about something, deeply. Seek out this passion by opening your mind to it, by looking for things that are interesting to you, by reading about interesting people and emulating them, by trying new things and being willing to make mistakes, by getting good at something through intense practice, by allowing yourself to get excited! You might not find this passion on your first try, but by looking, you’ll start the process and eventually find it.

3. Write when you’re excited, not on a schedule

There’s something to be said about writing at the same time, every day, but when it’s forced, it’ll show up in your writing. You need to notice when you’re getting excited about something, and take that opportunity to sit down and write, right then. Close off the distractions of the Internet, and just write. Let the excitement of the moment pour out into the writing. Seize the moment, wherever you are, to write.

4. Pump up the jams

The right music can get you excited, and help motivate you to write with passion. I like anything with a good beat, from heavy metal to rap to punk. Avoid the mellow stuff — while it’s incredibly beautiful and soothing, it doesn’t induce passion.

5. Coffee

Lots of it. Gets the passion flowing like nothing else. Interestingly, the worse the coffee, the better it works.

6. Write passionately, become a better writer

When you write with passion, not only does it show in your writing and help motivate you, it actually makes you better. You’ll falter at first, but the strength that this passion gives you will pound at your writing and pound at it until the writing has no choice but to be better. This happens over time, but it’s inevitable — the writing becomes transformed. It’s not a magical quality — it’s basically just the idea that the more you do something, with intensity, the better you’ll be at it.

7. Read others who are passionate

The best writers and bloggers have passion, and reading them will inspire you to do the same. I like the inspired rants of Aaron Swartz, the poetry of Idle Words, the lyricism of Textism, the humor of Dooce, and many others. Find your own muses, and let them fire you up.

You can read more from Leo Babauta on Zen Habits or on his new blog on minimalism, mnmlist.com, where he is offering a new free minimalist Wordpress theme called mnmlist. Follow Leo on Twitter.

Outbound Links - An Endangered Species? [And Why I Still Link Up]

Yesterday on Twitter I made this remark:

“A change I’ve noticed from the ‘old days’ of blogging - people don’t link when they quote you as much as they used to.”

The replies to my tweet were quite varied - some agreed while some disagreed - some argued that a link was not necessary while others argued that it was essential. The replies highlighted just how much diversity of opinion there was on the topic so I thought I’d put together a few thoughts on the topic.

But before I share why I DO link to others from my blogs when quoting or borrowing ideas directly from others I thought it might be worthwhile sharing some of the reasons people gave yesterday for why they thought links were becoming LESS used in this way.

1. Competition

The most common remark to my tweet was that people thought it was mainly to do with a change in the way that bloggers viewed other blogs in their niche.

The theory is that in ‘the old days’ of blogging the blogosphere was more about sharing ideas, networking, communal learning etc - but that these days it’s more about ‘getting ahead’ or ‘empire building’ in some way. As a result other blogs are less seen as an opportunity to network or have mutually beneficial opportunities - but that they’re more seen as ‘the competition’.

Of course there are plenty of examples where this is not the case - but I suspect it’s one of the reasons that some bloggers don’t link out to others.

2. PageRank Sculpting

The other main theory that people shared (and a few admitted it was why they didn’t link out) was that they saw links on their blogs as valuable and wanted to use them in ways that benefited themselves by ‘sculpting’ the link juice on their sites.

This is an SEO (search engine optimisation) approach to linking - the theory is that the more links you have on a page the less weight each one of them carries in passing on page rank to the sites you’re linking to.

The idea is that you link to fewer sites so that the few that you do link to (your own internal links, links to your other sites, links to partners sites or those paying for links) have maximum benefit. The practice is to limit links and/or use nofollow tags on any link that you don’t want to pass page rank so that those that do pass it pass the maximum.

I know that most bloggers probably don’t page sculpting in mind when they’re linking to other blogs - but it was the 2nd most mentioned explanation that people mentioned to me on Twitter yesterday.

3. Laziness and/or Forgetfulness

The third theory shared on why people don’t link is that they either forget to or that they’re just too lazy to do it.

I suspect that most bloggers at one time or another have inadvertently forgotten to link to another page when quoting them or bouncing off something they’ve written. I know I’ve done this a number of times over the years (I fix them when they’re brought to my attention).

4. Ignorance

The last theory that some of my followers shared is that they thought that some people simply where not aware of the etiquette when it comes to quoting others (or that they simply didn’t believe in it).

This was highlighted to me in a couple of the DMs that I received after my tweet from people who admitted that they didn’t link to other sites that they quoted because they’d never heard of the practice. They did not do it maliciously, they had no ulterior motives - they’d just never thought to do it or been taught that that was what should happen.

5. Or Have Things Just Changed?

As I pondered the topic yesterday it struck me that perhaps things had simply changed and that I was ‘old fashioned’ in my approach.

Perhaps this ‘ignorance’ could also be explained by a change that is happening in the unspoken etiquette of the web? Perhaps there’s a transition in belief and behaviour happening here and I just need to get with the times?

After all times are changing - people of my parents generation are always telling me how things that they used to think were unacceptable are now common place…. social interactions change don’t they?

I really hope that this last theory is not the case - you see in my experience linking to other sites from your blog is actually something that is very powerful. In my experience it improves your blog to do it but also makes the web a better place.

Which leads me to an exploration of why I link out to other blogs and websites from my blog.

Why I DO Link to Other Sites

Let me start by saying that when I say I link to other blogs and websites that I’m talking about doing so as a way of giving credit to those sites. For example when I’m quoting someone or when I’m directly taking an idea that someone’s written about on their site and am extending it, reacting to it or bouncing off it some way on my own blog.

As I said above - I’m sure there are times when I’ve inadvertently not done this (you’re welcome to point them out to help me rectify this). Enough disclaimers - here’s some reasons that I do link:

1. Etiquette/Manners/Courtesy

At a base level I think it’s important to acknowledge the work of someone else when you use it.

When someone has written something that you’re quoting - that person has taken time to craft those words, they’ve gone to some effort to make the impression that they have on you. You in turn are using their words (and the effort that they went to to craft them) to improve your own blog in some way - as a result I think it’s important to acknowledge that.

You could of course do this without a link - but I think a link shows a little extra spirit of generosity and appreciation that is simply good courtesy in my mind.

2. Usefulness

Linking to your sources makes your content more useful to your readers.

Good content is useful content. I’m constantly talking about how to build a successful blog you need to be producing something that is useful in some way to those reading it. By linking to the page where you take a quote or idea you’re providing your readers with the opportunity to read more on the topic or see the quote in it’s original context.

Your reader may or may not click the link - but it does give them the opportunity to explore further or learn more.

I know that as a blog reader when I’m reading a quote that I find particularly interesting that I want to learn more about who said it. If there’s no easy way to do this I think have to go to the effort of researching myself. I actually find this annoying and it creates the impression to me that the author of the content is too lazy or stingy to go to the effort themselves.

Giving readers other things to read around the web adds depth to your blog. Yes it sends people away from your site to read someone else’s - but if it’s a link to something good they’re more likely to come back because you become a trusted source of information.

3. It Makes the Web Better

Links are what makes the internet what it is.

I still remember the first day I got online. I’m not sure what I was expecting when I connected on my brand new dialup modem but I do remember looking at my watch later that day and realising that 7 hours had passed and that I’d barely moved much more than the index finger on my mouse as I surfed from one page to another.

I was caught in the ‘web’. One site led to another which lead to another which led to another - the web inspired me.

I had a similar feeling the first day I visited the first blog that I had ever read - it linked out generously to other blogs in its niche which in turn linked to others. I was immediately hooked into this community of websites - but particularly to that first one which got me going.

Perhaps this is a little naive - but for me the internet has always been built on the ‘link’. It’s what makes it so great and as someone wanting to be a good citizen of the web I think it’s important to continue the tradition of what has made it great.

4. The Power of Links to Build Relationships

A simple link to another site can get you on their radar and be the beginning of a fruitful and mutually beneficial relationship.

Here’s a quick illustration as to the power of a link:

Every month or two on my photography blog I run a post that is simply a list of interesting links from other photography sites around the web from the last month. I sometimes throw a few internal links into these posts but they’re largely just a list of links with short descriptions to other photography sites.

There are many benefits of these posts, for example:

  • they’ve been on the front page of Digg and can be spread virally around the web
  • they’re useful to readers and I get a lot of thank you comments and emails from readers as a result

But the biggest benefit to me from these types of posts is the impact that they have on the sites I’m linking to. Last time I did one of these posts I linked to 15 or so other photography sites.

  • The next day I had 5 emails from owners of these sites. All thanked me for the link.
  • 2 of those who wrote offered to write guest posts for my blog.
  • Over the coming week 6 of the sites I linked to linked back to my blog
  • Others tweeted about the post
  • 2 of the other bloggers and I have been exploring ways we can work more together

All of this started simply with some linking to other quality content in my niche.

While my blog has a fairly big readership and the traffic I sent out was substantial - the same principle is true for sites of all sizes - links have the potential to get you on the radar of other bloggers and web masters - where this can lead you is anyone’s guess.

5. Outbound Links and SEO

Outbound links can help your blog’s search engine optimisation (directly perhaps but indirectly definitely).

I’ve heard it argued that relevant outbound links can actually help your own site’s ranking in search engines (ie search engines look at the sites you’re linking to as part of their algorithm).

I have heard this debated and in my own limited testing have not seen it as a major factor (it may be a minor one but other factors like your title tags have a much bigger impact) - HOWEVER I do think that linking out can definitely indirectly help your SEO - based upon reasons we’ve already covered:

  • Linking can stimulate reciprocal links - as a result of building relationships with other websites you increase the chance of being linked to yourself. It doesn’t happen every time but sometimes when you link to another blog you’ll find that blogger starts to subscribe to yours and in time will link back. This helps your search ranking.
  • Useful content ranks high - Google’s main purpose with it’s algorithm is to find the best content it can and rank it highly. If links increase your site’s usefulness (point #2 above) in time you’ll see this reflected in your Google ranking as your site gets passed around by readers and Google does its thing in finding it.

I can’t guarantee that you’ll rank high in Google by linking to other sites - but indirectly I think it can certainly be helpful. I guess this really comes down to my main philosophy about SEO - set your blog up well and be aware of the principles of SEO but then concentrate on producing the kind of content that the search engines are looking for and build relationships/network. Search rankings tend to have a way of looking after themselves.

Quick Tips on Linking Out

Let me conclude with a few last thoughts:

Don’t link out for the sake of it - I’ve seen some bloggers link out to other blogs in large quantities with the belief that it’ll help them build relationships with loads of other bloggers. Link out when it’s relevant to do so, when you’re giving credit and when you think it makes your content more useful.

Don’t get caught up in linking schemes - one thing I do know is that Google is always on the look out for ‘link farms’ or schemes designed to manipulate their rankings. I won’t pretend to know where Google draws the line but simple reciprocal links seem to carry less weight than normal organic links and when search engines spot you involved in a bad neighbourhood of the web engaging in lots of interlinking you’re probably going to do yourself more harm than good.

I don’t get into it at all these days but IF you’re going to get into reciprocal links keep them relevant to your content, do it in moderation and make sure that the sites you’re linking to are of a high standard and quality.

PS: a quote from Google’s Matt Cutts:

Let me finish with a quote (and a link of course) from Google’s Matt Cutts:

“I would recommend the first-order things to pay attention to are 1) making great content that will attract links in the first place, and 2) choosing a site architecture that makes your site usable/crawlable for humans and search engines alike.”

I’m interested to hear your thoughts (and practices) when it comes to linking out from your blog. Do you do it? Why/Why Not?

Brainstorm 10 Ways to Expand Your Blog [HOMEWORK]

In this post I’d like to share a simple exercise that helped me to grow ProBlogger beyond being just a simple blog {image by deserttrumpet}.

How are you planning on expanding your blog?

brainstormYesterday as I was going through some files on an old computer I stumbled upon a brainstorming document that I’d written 4 years ago about this very site - ProBlogger. I wrote it almost exactly 1 year after I started this blog.

In the document I’d set myself the task of brainstorming a variety of ways that I could expand ProBlogger beyond being just a blog. While I knew the idea of a blog helping bloggers to make money from and improve their blogs had potential - I also knew that there was potential to build something more successful and profitable by going beyond just having a blog.

For this task I gave myself permission to dream big and to come up with things that I may never implement.

Here’s some of the possibilities that I’d jotted down:

  • ProBlogger Forum/Community - where readers can interact with each other - possibly a forum
  • Job Boards - a place where bloggers looking for work can find jobs and where advertisers can find bloggers
  • ProBlogger Training/Speaking - develop training modules to do with groups of bloggers
  • ProBlogger TV - a video section of the site
  • ProBlogger Shop - selling merchandise but also tools for bloggers
  • ProBlogger Services - a consulting service for bloggers
  • ProBlogger Ad Network - an ad network for bloggers to join to make money from their blogs
  • ProBlogger Books - self publish a book about how to blog for profit - perhaps a downloadable book.
  • Start Related Blogs - starting blogs on topics related to blogging (SEO, different platforms etc)

There was a lot more in the list (in fact there were about 40 ideas) but these were the first on it. I wrote a paragraph or two on each idea - fleshing it out with extra details.

Of course there’s a variety of things that I’ve done and not done with these ideas:

  • Some became a reality (Job Boards, Writing the ProBlogger book and starting TwiTIp for example)
  • Some I’m still planning on doing (our Community Section will hopefully launch next week)
  • Some I tried and abandoned (for example I tried a shop where I sold T-shirts for a while but it never really worked)
  • Some I evolved into other things (the TV idea evolved into semi regular video posts)
  • Some I plan to do in future (those ones are in my secret file)
  • Some I’ve never done and probably never will try.

Whether I’ve done all of the things that I dreamt of back then doesn’t really matter….

What’s important (to me at least) is that I put some time aside in the very early days of my blog to dream, brainstorm and come up with ideas of how to take my site further than it was.

Your Homework

Today I’d like to invite you to do this type of exercise for yourself.

How might your blog look in 4-5 years time? Create a list of 10 ways that you might one day expand your blog.

OK - I know this seems like a pretty crazy task for some of you because I know for a fact that many ProBlogger readers are just starting out and are still in their launch (or even pre-launch) phase - however I do think that this type of exercise can be helpful even if you don’t do much with the ideas you come up with.

For me this type of brainstorming has not only led to concrete ideas and plans but even just the process of dreaming has inspired me to keep growing my blogs. I also think that having some bigger possibilities in mind can sometimes help you to shape your blog in the here and now.

So open up a document or grab a pen and paper or a whiteboard and start to dream and brainstorm about how you might one day expand your blog.

While I don’t want to limit your brainstorming by giving you too many ideas - you might like to think about some of these:

  • different mediums you might like to add (video, forums etc)
  • other related blogs you could start
  • services that you could offer
  • new categories that you could write about
  • new sections of your site that you could add
  • new features that you could offer readers

If you’d like to share some of what you come up with please feel free to share some of your thoughts in comments below.

In the coming weeks I’m going to share a variety of ways that I see blogs expanding that I hope might give you a little further inspiration on this topic - but in the mean time do the exercise for yourself and see where it might lead you!

Want a Crash-Proof Site? A Paint-by-Numbers Guide to Using (and Surviving) Amazon S3

By Mary Jaksch from GoodlifeZen.

Do you dream of creating a post or Ebook that goes viral? If you do, you might run into a problem. People flock to your site. You’re ecstatic about the spike in your visitor numbers. And then your site crashes.

The problem is that your site can buckle or crash under the strain of using too much bandwidth. So in order to safeguard your site, it’s important to use as little bandwidth as possible. But how can you do that if you want to use images, audio, or even video on your site? Luckily, there is a nifty solution. And it’s dirt cheap!

The solution is Amazon S3.

What is Amazon S3? I’m not a geek, so I’ll give a simple explanation:

Imagine for a moment that you’ve got a storage problem in your home. One way to deal with this, is to rent space in a storage facility. This is exactly what Amazon S3 is: it’s an online storage facility.

You know Amazon.com, right? That’s the big online store that sells books and other stuff. I’m sure you can imagine that they have a huge server capacity because they’ve got so much stuff on their site. Amazon S3 is a system that rents out some of their spare capacity. For cents, not dollars.

Advantages

  • Amazon S3 is super cheap.
    There are no setup fees or minimum costs. You only pay for what you use, even if it’s just a couple of cents a month. We are literally talking cents, not dollars here!
  • It works.
    All your images look just like usual and you can control the size and placement just as before.
  • It’s easy to use - eventually.
    With the help of Wordpress plugin Amazon S3, you can upload images through Amazon S3 automatically. If you’re not on Wordpress, or if you’re uploading videos or audio, you can upload manually.

Disadvantages

  • The setup is complex and glitch-rich.
    Setting up on Amazon S3, the Firefox S3 Organizer, and the WP Amazon S3 takes time and can be frustrating.
  • Amazon S3 only works with Firefox.
    In order to upload manually, you need to use the (free) Firefox extension S3Fox Organizer
  • There are plenty of pitfalls.
    Uploading manually with Firefox S3 Organizer is fraught with possible errors. (People have been known to punch their computer in frustration!)

Set up Amazon S3 in three (reasonably easy) steps

Step #1: Set up your account on Amazon S3
Go to the home of Amazon S3 and set up your account. This video will help you. Just follow the steps.

Step #2: Install and set up the Firefox extension Amazon S3
Go to s3fox.net to install the Firefox Extension. Once you have installed it, you can access it by clicking on ‘Tools’ on the Firefox navigation bar. Once you’ve installed the extension, set up at least one ‘bucket’. (This is what storage folders are called.)

Take a look at the video I suggested above. In the second half it tells you how to upload files, using the Firefox S3 Organizer. Make sure you take note of how to set ACL permissions.These permissions say whether only you can read the file you’ve uploaded, or whether it will be available to the general public.

The way to change the ACL permissions is to highlight a file you’ve uploaded, then click on the pencil icon in the bar above it. Make sure the file has three green ticks, i.e., set it to ‘read’ for everyone.

Step #3: Set up Wordpress plugin Amazon S3
There is a nifty WordPress plugin called Amazon S3. Download the plugin and unzip the file. To install it, use an FTP client (that’s software to get stuff onto your site), and upload the unzipped file into your Plugin folder. Then go to your WordPress Dashboard and click on Plugins.

Activate the plugin. It will ask you for the “AWS Access ID” and your Secret Key. If you’re not sure what they are, have another look at the video above. It’s explained how to find them. Once you’ve inserted your ID and Secret Key, the plugin is ready to roll.

Pitfalls nobody tells you about.

  • Pitfall #1 You haven’t set up a ‘bucket’
    If you have more than one website, chose one bucket per website. (A bucket is like a storage room for files). You could also have a bucket each for images, audio files, PDF’s and so on. Setting up a bucket is an essential part of the process if you want to use the WP Amazon S3 plugin. The plugin won’t work without at least one bucket!
  • Pitfall #2 You cant find the correct upload URL
    In order to put the stuff on your website, you need to know what the correct address is. Unfortunately, the S3 Organizer fails to point out this small but crucial detail! Here is an example from my GoodlifeZEN website: http://goodlifezen.s3.amazonaws.com/welcome-GLZ-5.flv -it’s the actual address of my ‘welcome’ video.
    The ‘bucket’ or S3 folder I’ve set up is called goodlifezen, and the file name is welcome-GLZ-5.flv. When formatting the file address, use your bucket name, then s3.amazonaws.com/ followed by the file name.
  • Pitfall #3 You just can’t get the darn thing to work.
    You’ve done everything right, but when you click on the link, you get error message or the plugin refuses to work. Frustrating! Take a deeeep breath and don’t throw your toys out of the cot just yet. Consult the following troubleshooting section first.

Troubleshooting

  • Problem: You’ve installed the S3 Plugin and it comes up with an error message - even though you’ve put in your ID and Secret Key correctly.
    Solution: Did you cut and past the keys? If so, try to type in the ID and key number.
  • Problem: You’ve managed to install everything correctly but when you try to access the file on the Net, you get the message ‘Access Denied’.
    Solution: Check the ‘read’ permissions and make sure you have three green ticks.
    (See above to read about ACL permissions).
  • Problem: You’ve set permissions correctly, but still get the ‘Access Denied’ message.
    Solution: Check whether the file you’re trying to upload is located in a folder. If so, change the address to include the folder. Here’s an example: Let’s pretend that the file I mentioned above was uploaded within a folder called video. The correct address for the file would then be: http://goodlifezen.s3.amazonaws.com/video/welcome-GLZ-5.flv. As you can see, the folder name is now included in the pathway to the file.
  • Problem: You try to access the uploaded file but get an error message, saying: ‘File not found’. This can mean that the the link address isn’t configured correctly.
    Solution: Check and correct the link address. The quickest way to check is to put the address in your browser window.
  • Problem: You’ve configured everything correctly, and you still get ‘Access denied’ message and are just about to throw your computer out of the window.
    Solution: Go back to the Firefox S3 Organizer and check that the filename you chose is in lower case. If not, rename the file and upload it again.
  • Problem: Your S3 plugin isn’t working. Solution: check whether your site running on PHP 5. (This is the scripting language your site is using). Ask your hosting company what PHP your site is running on and how to change it. It’s usually just a one-click change. This plugin will only run on PHP 5.
  • Problem: Your S3 plugin still isn’t working.
    Solution: Make sure you’ve created a bucket in your Firefox S3 Organizer. The plugin won’t work without creating a bucket first.
  • Problem: You’ve tried it all but it still doesn’t work.
    Solution: Shoot your computer, forget about Amazon S3, or leave a rude comment.

You’ve set up Amazon S3. Now what?

If you are not a Wordpress user:
You can manually upload any file through the Firefox S3 Organizer. Then link to the uploaded file using the address formatted as explained above.

Wordpress users:
Once you’ve installed the plugin, everything is automatic - at least where images are concerned. Upload your images as usual and the plugin will automatically upload the image to your Amazon S3 bucket and create a link to it. It’s easy! You can also upload PDF or other text files with ease.

Audio and video
Putting up audios is relatively easy. I use a WP plugin called Audio Player for the podcasts. I manually upload the audio files through the Firefox S3 Organizer and then link to them on site, using the correct plugin configuration.

Putting videos on your site is more complex. I use a JV FLV Player and upload with Amazon S3.

Conclusion

Setting up Amazon S3 is complex but not difficult. Allow about 20 minutes to get everything set up. Once you’ve got it set up, you will love it! You won’t have any more problems with bandwidth and you can store your files there for mere cents.

I’d like to acknowledge Dave Kaminski of the Video University Blog. Without his ever-patient support I would never have overcome all the obstacles to using Amazon S3.

You can read more by Mary Jaksch on her blog GoodlifeZen or on Write to Done where she is the Editor. Join Mary on Twitter.

Thirteen Steps to Write and Publish a Free Ebook In Thirteen Hours

Have you ever considered producing an ebook for your blog readers? In this comprehensive post Ali Hale breaks down the process of how to do it.

There’s never enough time. In an ideal world, you’d be posting to your blog frequently, writing great guest posts, building relationships with other bloggers, and responding to every single comment … and all that’s more than you can manage. You might have considered writing an ebook as a companion to your blog, but you just can’t find the time or the energy for it.

You already know all the reasons to do it: you’ve downloaded your share of free ebooks from other blogs, and you’ve seen that:

  • Free ebooks can be used as what Sonia Simone calls “cookie content”, to entice newsletter sign-ups
  • Free ebooks can be a great traffic draw: they get twittered about and linked to
  • Just having a free ebook available on your site will subtly shift readers’ perceptions: they’ll see you as one of the “big guys” of the blogging world

But, of course, an ebook is harder to create than a blog post. A 25-page ebook is 4,000 words or more; you have to edit and proof-read carefully (once people are emailing that ebook to one another, you can’t fix that embarrassing typo or broken link); you’ll need PDF and ebook cover software if you want it to look professional; you have to launch it with a bang…

Writing an ebook isn’t an easy undertaking, and it’s something a lot of bloggers never do. That’s why, if you do write a high-quality free ebook, you’re going to stand out.

Here’s how I wrote, published and launched my free ebook in just thirteen hours and how you could do the same. My time broke down like this:

  • Writing an outline: 30 minutes
  • First draft of content: 4 hours
  • Adding some graphics: 1 hour 30 mins (mostly my boyfriend’s work!)
  • Redrafting and editing, inserting all links: 3 hours
  • Appendix of resources: 1 hour
  • Creating a cover: 1 hour 30 mins
  • Converting to pdf: almost instant!
  • Final proof-read and link-checking: 15 minutes
  • Launching and spreading the word: 1 hour 15 minutes

I spread the tasks above across four days: I’m a freelancer so my schedule’s quite flexible, but I do have to do a bit of paying work once in a while!

And here’s your 13-step guide to doing the same:

Step 1: Get an Idea

You need a clear concept for your ebook. An ebook isn’t a blog post – but it’s not a blog either: don’t make it a general overview of your niche (especially if it’s quite broad). Pick one category from your blog, or a topic which would make a series of blog posts.

I’d wanted to create a free ebook for a while, but it was one of those things I thought I’d get around to “when I have a bit more time”. Then I came up with an idea for a mini-series of two linked posts (Reframing Work #1: Ditching Drudgery and the Conventional View of “Work” and Reframing Work #2: Min Hours, Max Cash – or Do What You Love?) which would lead very naturally to the ebook (Quit Your Day Job). I decided I was going to go ahead and launch it, a week after the first post in the series. This led to…

Step 2: Tell Your Readers

Tell your readers that you’ll be bringing out a free ebook in a week or two weeks’ time. It’s amazing how a deadline – and public accountability – can motivate you!

You might want to make the announcement in a post, on Twitter, or to your newsletter list. Communicate a sense of excitement: tell readers you have a “treat” or “goodies” coming up. This is part of the pre-launch process of getting a buzz going. I personally find the word “freebie” can have a bit of a connotation of something cheap and rubbishy – but you might think differently!

Step 3: Write the Outline

If you write long blog posts, you might already be in the habit of outlining before you begin. With an ebook, this is crucial: you don’t want to write for hours only to find you’ve wandered far off-topic. Neither do you want to sit staring at a blank screen, wondering what you’re going to say next.

Open up a blank document or sit down with a piece of paper and write an outline before you go any further with your ebook. Everyone has different ways of doing this, but one which works well for me is:

  • Spend five minutes mind-mapping: write down your ebook’s title or theme in the centre of a piece of paper, then jot down all the points that come to mind
  • Eliminate any points which are too broad for the ebook’s scope. Order the rest in a logical sequence (I just jot a number next to each)
  • Type or write out the list in order. These are your subsections or chapters in the ebook.
  • Jot down at least two bullet points for each section, or a couple of sentences: these are the main points you’re going to make. Sometimes, you’ll want subheadings within each section.
  • If you think of a great idea for a graphic, or a resource (book, blog, etc) to recommend, write that down here too.

It might sound complicated, but if you sit down for an uninterrupted half-hour, you can easily get a complete outline written.

Once you’ve got a list of sections and subsections, think about roughly how long each will need to be. Aim for a total of around 4,000 words: this is about right for a 25-page ebook set in a large font: I like 14 pt Calibri (Word 2007) or 11 pt Verdana.

Step 4: Draft the Content

This step is the one which many bloggers find daunting – writing enough words to fill an ebook. If it seems overwhelming, try thinking about your ebook as a series of linked blog posts (with each subheading starting off a new post). Your outline really helps here, because it breaks writing your ebook into manageable chunks.

And these four tips should help too:

First: Get Rid of Distractions

It’s crucial that you avoid distractions while you’re writing. That means keeping away from emails, Twitter and Facebook till you’re done. You don’t need to write the whole ebook in one go – but try to give yourself a block of at least two hours to work on it, or set yourself the goal of drafting a certain number of sections.

If your family or housemates are likely to interrupt you, try heading off to a coffee shop or library for a few hours.

If you find it hard to concentrate, try using a full screen text program (I like Dark Room), or switch off your internet connection!

Second: Don’t Edit As You Write

This is your first draft, so forget any worries about the quality of your writing. Don’t keep editing sentences to try to make them perfect – just move on. You can come back and rewrite later: your current task is simply to get a complete draft down.

Third: Don’t Stop to Look Things Up

Don’t stop to look up links, quotes or statistics that you want to include. Just make a note to yourself in the body of the text. I tend to enclose these in square brackets [like this]. Stopping part-way through a paragraph or sentence breaks your flow … and it’s very easy to start looking up one quote and get distracted!

Fourth: Don’t Format While Drafting

Your finished ebook is going to be a visual masterpiece, with a cover page, section headings, subsection headings, bold text, italic text, lists, maybe tables and specially-formatted blockquotes…

Your first draft, however, should have few or none of these. It’s easy to get distracted with formatting, and it’s also inefficient to format before all the text’s written – you’ll find yourself changing a lot of things around.

Keep your formatting to a bare minimum while you’re drafting. You might find it useful to format headers and subheaders (make sure you know how to use styles in Word – don’t edit each header separately) – but the rest can wait.

Step 5: Add Any Graphics

Once the draft is complete, add any graphics that you want to include in your ebook. The type of graphics you use will depend on the topic of your ebook, but you might want to consider:

  • Charts to show statistics in a visual, instant way
  • Diagrams to explain complex concepts
  • Illustrations or photographs to complement the text
  • Small graphics to highlight tips, warnings or quotes

Don’t make the mistake of just using pictures to break up the text. If you use a large font size and use design elements well (just as you would in a blog post), then you don’t need to stuff your ebook with pictures. Graphics used for the sake of it don’t add much to the reading experience, and finding or creating suitable images can use up a lot of your time.

When you’re looking for graphics, be mindful of copyright laws. If you’re using images from Flickr licensed under Creative Commons, make sure you credit and link to the owner in the ebook. If you have a small budget for the ebook, you might consider buying stock photos from istockphoto or fotolia.

You should get your graphics in place at this stage because you may want to change around some of the text to explain or to tie in with the images you’ve chosen.

Step 6: Redraft and Edit Your Text

You’ve got your first draft done – the hardest part’s over. Now it’s time to revise, edit and polish your ebook until it shines!

As with the first draft, you need to find some uninterrupted time and space for this: it’s all too easy to make mistakes or forget to remove those “[notes to self]” when you’re getting interrupted.

It also helps if you follow a step-by-step method, working on one aspect of the redrafting and editing throughout the whole document, rather than trying to perfect each page as you go along.

My process for redrafting and editing is as follows:

  • Edit for Structure
  • Edit to Add Quotes, Examples and Links
  • Edit for Flow and Tone

First: Edit for Structure

Your first round of edits deal with the “big picture”: making sure that your chapters or sections are in the right order and cover all the points you wanted to make. Start at page one and read, fairly quickly, through the whole ebook. Look out for:

  • Sections which would work better in a different order
  • Places where you’ve repeated yourself in two different sections
  • Sections which are too short (you may need to expand and give more detail)
  • Sections which are too long (cut any waffle!)

Second: Edit to Add Quotes, Examples and Links

Once you’ve got the broad structure right, you can decide where best to enter quotes and examples. This will depend on the format of your ebook, but some things you may want to consider are:

  • Using an example, quote, tips box or case study to break up a long section of text
  • Creating a pattern: eg. opening or ending each section with a quote or case study
  • Putting all the links at the end of each sections for easy reference (even if you also link in the body of the text)

You may find that you need to move around a few sentences or paragraphs in order to make the quote, example or case study work well.

Third: Edit for Flow and Tone

Rewrite any sentences which sound clumsy or which are ambiguous. You might like to try reading your ebook aloud: this often highlights any over-long or complicated sentences!

This is also a good point to check that you’ve used a consistent tone of voice throughout your ebook. Did you start off chatty but then drop into a more formal style? If you’re not a naturally humorous writer, make sure that any jokes or puns you’ve included really are funny.

Step 7: Format Your Ebook

Now that the text is complete, go through and get everything into the right format. Set all your headers and subheaders, making sure that you use the “Styles and Formatting” feature of Word (or your chosen word processing program). Don’t set the font size and style each heading manually. It’s not only inefficient, it stops you making an automatic table of contents – more on that in a moment!

(You might want to read up on Styles and Formatting, if you’re not sure how to use this feature.)

Choose a modern, easy-to-read font for your text and for your headings. Make both text and headings quite large – bigger than you’d use in a document for work or school. As I mentioned in Step 3, I like 14 pt Calibri (Word 2007) or 11 pt Verdana.

As well as formatting your section headings, you’ll also want to use some of the formatting options that you’re familiar with from blogging. This might include:

  • Using bold to emphasise key points, and italics for emphasised words
  • Setting out quotes in a different style (eg. indented, or in a box) from the main text
  • Using a magazine-style “pull box” for quick tips
  • Breaking some paragraphs into lists, to help keep the reader’s attention

You’ll also want to put a header or footer on each page with, at the very least, the page number. Consider including the title of the ebook in the header/footer on each page (in case readers print it out). You could also put your name, your copyright notice, or the URL of your blog.

Note that if you’re including a cover (and I recommend that you do), you can tell Word to use a different header and footer on the first page.

Step 8: Add a Table of Contents and Appendix

An easy way to make your ebook instantly stand out from the crowd is to add a table of contents and/or an appendix. Professional ebooks (and paper books!) have these – so why shouldn’t yours?

Table of Contents

If you’ve used Word’s Styles and Formatting feature to set up your headers, it’s really easy to add a table of contents. Just insert a new page at the start of your ebook, and (in Word 2007), go to the “References” tab, then click “Table of Contents” on the far left.

Word will automatically lay out the table with the headings, subheadings and page numbers. If you change the ebook after creating the table of contents, simply right-click on it and “update”. This is the table of contents from my ebook:

table-of-contents.jpg

Appendix

In my ebook, I wanted to supply some ideas for further reading at the end. These didn’t fit with the body of the text, so I created an appendix.

Depending on your ebook’s subject, your appendix could be:

  • A quick tutorial on something which some of your readers will understand but others won’t (you don’t want to put this in the middle of your ebook as those who “get it” will start skipping)
  • A list of recommended resources, like websites, blogs, books, products, services…
  • A “cheat sheet” for readers to print out – popular in technical fields
  • A list of notes and references for each section – often in more scientific books

Creating an appendix is simply a matter of starting a new page and putting the header “Appendix” (or, if you want multiple appendices, “Appendix 1”, “Appendix 2” etc.)

Step 9: Create Your Front Cover – And a Graphic

All the hard work of writing and formatting the text is done: here’s the fun part – creating your ebook cover!

I’d recommend spending a couple of dollars when creating your cover. Look through istockphoto or fotolia for a great, eye-catching image. Ideally, you want something without too much detail (as you’ll be using a thumbnail of the cover pic on your blog, to advertise the ebook).

I’m no designer, and it took me some time to make a cover that didn’t look hopelessly amateur! You might want to enlist a friend with a good eye for design, though some quick tips are:

  • Use a big, clear font for the title of your ebook
  • Consider having a subtitle or strapline in a smaller font
  • Stick to just two or three colours
  • Come up with a few designs or layouts and pick the one you like best

Once you’ve put your cover in as the first page as your ebook, take a screenshot and save it as a .jpg. If you can afford to spend a bit more (currently $27), I highly recommend a piece of software called eCover Software Pro, which I’ve reviewed here. It allows you to “drop” that image onto a book-shaped template, so that it looks something like this:

front-cover.jpg

It’s very straightforward and intuitive to use, and it’s a powerful way to send readers the signal that you’re a serious problogger.

Step 10: Convert Your Ebook to a PDF

When I first started creating ebooks, I tried out a lot of different free options for turning Word documents into PDF files. The problem was, they didn’t keep links unless the links were written out as a full URL – so www.aliventures.com would remain as a link, but Aliventures wouldn’t! This also meant that they didn’t keep in the links that “jump” the reader from the contents page to the entry that they’ve clicked on.

A few months ago, I bought version 8 of Adobe’s Acrobat software – which cost over $100. I realised that spending hours trying to put the links back in manually each time would cost me a lot more, in the long term. It is a big outlay when you’re starting out as a ProBlogger, so I’d recommend doing what I did – look on ebay for a slightly older version of Adobe (as I write this, 9 is the current version, so look for 8 or 7). This will be just as good for your purposes, and will cost a bit less than the latest.

You could also see if your workplace or college has Adobe Acrobat. Or ask on Twitter to see if a willing friend can convert it for you! (You’re welcome to send me a Tweet if I can lend a hand.)

The best free option I’ve used was pdf995, so if all else fails, give that a try!

Note: If you have Word 2007, you can use the “Publish as PDF” feature. I’ve not used this myself (since I have Adobe Acrobat) so I can’t vouch for how good it is or whether it will include all links. If anyone knows, do tell us in the comments!

Step 11: Final Proof-Read and Link Check

Once you’ve got your PDF file, go through and do one last check for typos. Try not to get tempted to do much editing at this stage … you could carry on tweaking for ever. Just check for anything that’s obviously wrong.

This is a good point to double-check that all the links are working – just in case anything hasn’t converted properly, or in case you put a link in wrong.

Step 12: Publish and Publicise

Publishing the ebook on your blog is easy, compared with all the work of creating it! You can either upload it using your blog software’s “upload” function (go to Media->Add New in Wordpress), or you can use an FTP program to do so.

Create a new post telling people about your ebook, using the cover image that you created (either with eCover Software Pro or as a “flat” looking image).

Then get the word out! Tweet about it, ask for retweets, send emails to blogger friends – though do make sure your ebook will be on-topic for their blog. You might even consider writing a press release to send to your local paper.

I decided to run a competition in connection with the free ebook launch, which helped to gather retweets and a bit of a “buzz”.

Step 13: Relax!

Finally, give yourself a well-earned break! Your ebook’s out there, and your blog’s getting a lot of new visitors. Get yourself a glass of wine, a beer or a mug of great coffee … and start thinking about your next ebook.

As well as writing ebooks, Ali Hale writes a blog on “getting more from life” at www.aliventures.com: you can get her twice-weekly posts straight to your feed reader.

5 Ways to Get Your Blog Indexed by Google in 24 Hours

This is a guest-post from AdesBlog.com. Follow Ades on twitter @ades.

We all know that content is king and that if you keep blogging… if you keep doing what you love… the traffic and the money will follow suit. While that’s partially true, there is also things that you can do to:

  • Index your newly launched blog fast by major Search Engines
  • Increase traffic to your blog
  • Improve your SERPs (Search Engine Result Positions)

Why wait right? Content can be king but waiting around for traffic to come by itself is not a good way to start blogging. So let’s start…

Getting Indexed

Let’s say you launched a blog today and want it on Google’s results tomorrow. Can this be done? Yes.

Easiest way to get indexed by major Search Engines is to get mentioned by established blogs. This usually will get your blog indexed within 24 hours. But since we are new (i.e the newly launched blog of ours) I don’t think any blogger want to mention it. So instead of begging other bloggers to notice your newly launched blog, you just have to figure out other ways of getting indexed by Google fast. Can it be done? Absolutely! (All it takes a little effort on your side).

1. Blog Communities

There are few blog related community portals that have a very good rankings in Google and other Major Search Engines Results, they are: MyBlogLog, BlogCatalog, Blogged and NetworkedBlogs, particularly MyBlogLog. This means that if you get your blog on these blog communities, Google will have no other choice but to index your blog. So, go ahead and register for an account on these communities and list your blog on it. Once you are done you will have a page like this, this and this.

What to pay attention: Your blog’s description (have a proper write-up), keywords & tags (add related keywords and tags to your listing, this will be used by other members to find your blog), branding (put your logo, avatars, screenshots etc. have a consistent branding everywhere), and list your blog in the correct category.

2. Site Valuation & Stats Sites

Some of those How Much Your Site Worth? sites have a good ranking in Search Engines. All you need to do is to go there and check how much your site worth. This would create a special page for your blog (like this) and consecutively it would be indexed by Google. Here is a list of worthy sites: WebsiteOutlook, StatBrain, CubeStat, WebTrafficAgents, BuiltWith, WhoIs, QuarkBase, URLfan and AboutTheDomain.

3. Feed Aggregators

List your blog’s feed in these feed aggregators Feed-Squirrel, OctoFinder, FeedAdage. Once you have submitted your feed to these sites, they will keep track of your newly published posts and index them in their site. Whenever someone clicks on the blog post title, he/she will be redirected to your original blog post sending you free traffic and getting your latest posts indexed by Google.

4. Social Sites

Registering account on Social Sites with the same username as your blog’s URL is very effective in getting your blog indexed by Search Engines. Especially for those targeted keywords.

For example, if your blog’s name is WhiteElephant, it’s a good practice to register the same username at twitter as @WhiteElephant, and to create a page in Facebook at www.facebook.com/WhiteElephant. Having a consistent keyword-username on all major Social Sites will help get your blog indexed faster, and at a later stage it will also help build a “brand” for your blog.

So, get account on major Social Sites for your newly launched blog, namely: Twitter, Facebook (create a page for your blog), Digg, StumbleUpon, Delicious etc. By the way, it’s a good pratice to create a separate Social Sites account for each of your projects. This way you can stay focused and post messages that are related to your project. In the long run, this will help build a community that are like-minded around your project.

Note from Darren: it’s worth nothing that many social media sites (like Twitter) use no follow tags on links which means the links don’t really help with SEO. Having said this - it’s still worth getting pages for your keywords/brand as these pages can rank in and of themselves in Google and can help you to have control over numerous search results for the same keyword.

5. Misc Sites

Squidoo is a community website that allows people to create pages (called “lenses”) on various topics. Creating a topic that is related to your blog and then including your feed in that page would help your blog get indexed by Search Engines. Squidoo used to have a really good ranking in Google results, but not so much today. But it’s still ranks well and it shouldn’t be neglected.

ChangeDetection is a website that monitors sites for changes. When you monitor a particular site using ChangeDetection, it will ask you whether you want the notices to be public or private. If you say public, it will be published in their news section. For example; AdesBlog.com got an update today, type of update: text additions etc. This of course will get picked up by Search Engines and Search Engines in return will index your blog.

Technorati is a search engine for searching blogs. According to Wikipedia, as of June 2008, Technorati was indexing 112.8 million blogs and over 250 million pieces of tagged social media. It’s a dying breed, but not just dead yet. You have to definitely register for an account and get your blog listed on Technorati.

That’s it. Once you are done with creating accounts and submitting your newly launched blog in the above mentioned sites, you should see your blog in Google’s Search Results within 24 hours. Most of the time it will appear within the next few hours only.

Lastly, getting indexed is one thing but sustaining that traffic is another. And this is where the Content is King phrase should truly be emphasized. Because, without a good and valuable content, all your effort will be just wasted.

I hope you have found this post useful.

Abdylas Tynyshov (Ades) is a full-time blogger based in Kuala Lumpur, Malaysia. He blogs at http://www.adesblog.com and is the creator of a great freeware color picker tool. You can follow him on twitter at @ades.

Forums - How to Expand Your Blog #1

Yesterday I share with readers an exercise to brainstorm 10 ways that they might expand their blog in the coming years.

The reason I suggest the exercise is not that there’s anything wrong with being ‘just a blog’ but because as I look at a lot of top blogs going around today it strikes me that many of them have evolved in different directions and now also include other mediums, areas and features that wouldn’t normally appear on a blog.

By no means is it essential to grow your blog in this way - but it certainly is a trend among many successful blogs.

Over the next few days I want to explore some of the ways that I see blogs being expanded. Hopefully in doing so it’ll give those wanting to grow the potential of their blog a little inspiration in how they might do it.

Expand Your Blog with a Forum

Lets kick things off with a way of expanding a blog that many bloggers will be quite familiar with - adding a forum to your blog. This can be done either as a free area or a paid or premium area where members pay a subscription to join it.

Examples of Blogs and Forums Working Well Together

Screen shot 2009-09-09 at 2.12.00 PM.png1. Ars Technica - Major Tech blog Ars Technica has had a forum area operating for some time now.

I’m not sure how many members it has but as I write this it has over 700 signed in members on the forum and over 3500 guests viewing it.

Discussion areas cover most of the topics that the blog covers and in many areas there’s a lot of action (literally millions of posts).

Screen shot 2009-09-09 at 2.11.41 PM.png2. Digital Photography School - I quickly added a forum area to my own photography blog not long after I started the site as I began to hear from readers that they didn’t want to just respond to what I had to say - but they wanted to start conversations, ask questions and share what they were learning themselves.

This forum doesn’t get as many unique visitors as the blog area on DPS but it does drive a lot of page views. It also converts pretty well in terms of advertising and over time has been picking up speed as more and more members join and as the site begins to grow in it’s search engine ranking.

Other Examples include:

There are of course many others - feel free to suggest more in comments below.

Advantages of Forums

There are many advantages of starting a forum. Here are four that come to mind for me (and they just scratch the surface):

1. Increased reader engagement - one of the things that I noticed after starting the forum on DPS was that it seemed to hook people into the site for a longer period of time. Most blogs have a life cycle in terms of new readers where the average reader will eventually move on from the blog as their interests change, as their knowledge grows, as they master the topic being explored. However starting a membership or community focused area gives those who might move on from your blog a reason to stay connected - the relationships that they form. I know I have a few members of the DPS community who for one reason or another moved on from being blog readers but who are still central members of the forum.

The key thing is that forums require people to ‘sign up’ or become a member. This requires people to ‘buy in’ or invest a little something into your site which gives you a point of contact (you get email addresses etc) but also creates a point of connection and sense of ownership of your site in your reader. This extra engagement often leads to long term relationships and loyalty.

2. User Generated Content - one of the things I’ve been experimenting with in the DPS forum is to set up a ‘photography tutorials’ area. In this area we encourage readers to share what they’re learning about photography. It’s been a successful area of the forum for two reasons - firstly it creates useful content that other forum members enjoy but secondly it also has created content that I then can use on the blog.

Example: today I put together this post - 21 Great Reader Shots [And How They Took Them]

3. Increase Page Views - as mentioned above - my photography forum doesn’t get as many unique visitors to it as the blog area - but it does drive a lot of page views because each visitor who comes tends to view more pages per visit. This is fairly typical of forums as the way they’re set up tends to drive people to view multiple threads and view a thread multiple times as they interact with others. This can be a good way of making money via impression based advertising (although it can decrease the overall CPM rate if you’re using AdSense as someone viewing multiple pages is probably less likely to click ads).

What I find with having both a blog and forum is that there are some great cross promotional opportunities. In blog posts I’m constantly referring to threads in the forum that have examples of what I’m talking about or that I set up for people to share photos on the topic I’m talking about. Similarly in the forum we often point people with questions to tutorials in our forums. While some people tend to stay in one or the other of the areas - there’s a fair bit of cross over.

4. Appeal to a Different Type of Reader - I discovered a month or two into DPS forums that quite a few of those joining never read the blog area and that quite a few blog readers had little interest in using the forum. While some do use both areas it became evident to me that quite a few people preferred one medium over the other and that the two sections were appealing to two different types of people. I’m not sure if it’s to do with personality, demographic or learning style - but I guess we each find different mediums more appealing and starting a forum gives another option for people to connect with your site.

Challenges of Membership Areas

1. Moderation - most bloggers understand the challenge of moderating comments and protecting their blogs from spammers. On a blog comment moderation can be enough for some bloggers to give up and close comments - but on a forum there’s no such luxury because closing down comments kind of kills the whole purpose of a forum.

There are lots of tools and features of most forum platforms to help with this but in the end moderation takes a lot of time and effort. At DPS we have a growing team of volunteer moderators (lead by a paid community manager) to tackle this challenge. Much of their time is taken with dealing with spammers or trolls.

2. Community Building - our moderation team is not just there to police the negative stuff happening on the blog but also to grow/build the community. Building community doesn’t just happen - you can’t expect to just set up a forum area and automatically have community - it takes work, creativity and time.

3. Critical Mass - one of the biggest challenges with forums is having enough critical mass to be able to kick them off and attract other readers. This is why I didn’t start a forum on DPS immediately - I wanted to grow the blog’s readership first. I also started a Flickr group before the forum to grow a community there that I could then transition into a blog.

The other thing I did to get the forums active before going live was to invite a smaller group of my key commenters from the blog and long term newsletter subscribers to get early access to the forum so there was some activity there when the site went live.

Concluding Thoughts on Forums/Membership Areas

Forums are not easy. While they have many plusses they take a lot of work and time to build. They’re probably best suited to blogs with an established readership or list to help kick things off but also where the topics lend themselves to discussion, sharing of opinions or sharing of something else (eg. pictures).

Thủ thuật hay cho blogger Việt Nam

Giới thiệu danh sách toàn bộ các bài viết về thủ thuật dành cho Blogger – blogspot được đăng tại VnPressNet VnPressNet đã phân loại thành từng thư mục theo tính năng Danh sách thủ thuật »
tmtvietnam

LINKS

CHIKITA ADS

LOGOS/LINKS

TMT
 

Followers

Blog
Auto
Top
Bottom